Flipkart Search

Search This Blog

Thursday, May 14, 2009

Creating a ToDo List Using SQLite Part 2

This tutorial is part 2 in our series of creating a to-do list. I will assume that you have completed the following tutorial and its prequisites.

I will be using the code produced from that tutorial as a base for this one. When you are finished with this tutorial, your application will look something like this:

In this section, I will not only teach you how to display the SQL data in UITablewView, but I will be detailing how to display it in multiple columns with images and text. For this tutorial, you will need to download the following images.

We will be using these images to denote the priority (Green = low, Yellow = medium, Red = high).

Bring Your Code Up To Speed

Before we begin, we need to add some code to the Todo.h and Todo.m class to support the priority field in the database. Open up Todo.h and add the following code:

All that is new here is the added NSInteger priority property. We will be using this to get and set the priority for a given todo object. Next, open Todo.m and add the following code.

The first line that has changed is the synthesize line. We added our priority property to allow XCode to create the getter and setter methods for it. Next, you will notice that the sql statement has changed slightly. We are now getting the priority in addition to the text from the todo table. Finally, we set self.priority property to the selected priority value from the todo table. This is done by using the sqlite3_column_int method. We pass the init_statement and the number 1. 1 being the index of the sql array for which the priority data is contained.

Add Images to Your Project

Download the images above and save them to your project directory. Inside of your project, right click (control-click) on the Resources folder and click Add -> Existing Files… Browser for the images, select all of them and click Add. Check the box that sais “Copy items into destination group’s folder (if needed)”. Click Add. The image files should now appear inside of your Resources folder.

Create a UITableViewCell Subclass

To display data in columns within a UITableView, we have to create our own cell class that defines the type of data we want to display. By default, Apple provides us with a simple cell object that can only display one column of text. Normally, this is fine as it will work for a wide variety of applications. Since we require 3 columns for this tutorial, we need to wrap our own cell object.

Click File -> New File… and select UITableViewCell. Click Next.

Name this file TodoCell and make sure this that the box that sais “Also create TodoCell.h” is checked.

This will create a “barebones” UITableViewCell object with some basic methods already filled out. Let’s add some properties to this class. Open up TodoCell.h and add the following code.

Let’s take this line by line…

First, we see a Todo object being declared. Each cell will know which Todo item is associated with it. This will help out when updating the data in each cell. Next, we see 2 UILabels and a UIImageView. To understand why these components are needed, here is a screenshot of how each cell will look.

We see the “Green Dot” which is an image being rendered by a UIImageView. The word “low” and “Take out the trash” are both UILabels. After they are declared, we simply create them as properties. Notice that we are NOT creating a property for the Todo object. We will not be synthesizing it either. This is because we want this variable to be private. Setting this variable requires some additional code so we don’t want any code writer to simply be able to say cell.todo = foo; You will see why this is so further on in this tutorial.

Below this are some method declarations. First we see the method “imageForPriority”. We will be using this method to decide which image (green, red, yellow) gets displayed for a given priority. Next, we see the “getter and setter” methods for the todo object. As I explained above, the setter will contain additonal code besides assigning the todo object.

Now open up TodoCell.m. We will be writing quite a bit of code in here so I will break it up the best I can. First, add the following code to create some of the initialization:

Ok, some new stuff here. First, we see 3 static UIImages. These will hold reference to each of the three images (red, green, yellow). Since we only need to allocate them once, we make them static. Static means that they will be associated with the class not the instance. So we can make as many TodoCells as we want but only 3 UIImages will be created. On the next line there is a private interface. This allows us to declare a private method that no one else can use except this class. Following this is the synthesize line. Notice again that we are NOT synthesizing the todo object.

Looking at the initialize method… All that is going on here is we are intanciating each of our UIImages with the correct image for a given priority. This initialize method will get called once when the first instance of the todocell class is built. Moving on… Add the following code: (Note: it might be small and hard to read. If this is the case, click on the image to open it and the text will be full size)

This is the initialiazation method for any UITableViewCell. First, we need to call the super classe’s (UITableViewCell) initWithFrame to ensure that the underlying components of the cell get set up properly. Next, we get a reference to the contentView. The contentView is the view for each cell. We will be adding all of our UI components to this view.

The next 3 lines initialize a UIImageView and add it to our view. Notice that we are populating it with the priority1Image. This will just be a dummy placeholder until we update it.

Following this, we initialize the todoTextLabel. This label will display what it is we need “to do” such as “Take out the trash”. There is a method that we will be calling called “newLabelWithPrimaryColor”. This is a method I will detail a little further down. What it will do is build a new label with the attributes that we specify when we call it. This method was taken directly from Apple’s “Seismic XML” sample code. It’s pretty handy. After this gets called, we simply add the new label to our view and these steps get repeated for the todoPriorityLabel.

Finally, the method “bringSubviewToFront” is called on the priority UIImageView. This method is used in case there is text that gets near the image. It will cause the image to appear above the text. You can use this for layering your UI components.

Still with me? Good… now let’s add the following “getter” and “setter” methods for the todo object.

The first method todo is simple. All it does is return our todo object. The setTodo is a little more involved…

First, we set the incoming (newTodo) to our classe’s todo object. Next, we update the UITextLabel so we can display the detailed todo information. Following this we set the image of our UIImageView by calling the method imageforPriority. I will detail this method further down in this tutorial but all it does is return an image for a given priority. Last, we have a switch statement. The syntax of a switch statement is the same in objective C as it is in most languages. If you don’t know what a switch statement is Google it. Based on the priority of the newTodo, the priority label gets updated with one of three words (High, Medium, Low). The [self setNeedsDisplay] tells the cell to redisplay itself after this todo has been set.

Now, let’s add the code that lays out the cell.

This method gets called automatically when a UITableViewCell is being displayed. It tells the UITableView how to display your cell. The define statements are similar to define statements in C. The reason we are coding like this is because we can tweak these variables to get the display to our liking. First, we call the layoutSubviews of the super class. Next, we get a reference to the contentView.bounds. This variable will allow us to figure out how much drawing area we have and allow us to line objects up properly.

The if(!self.editing) part is not neccessary but is good practice. You would use this if you allowed editing of your cells. This code is a little tough to explain by typing, but I will do the best that I can. First, we declare our right-most column. This is done by making a frame to hold the content. This column will hold the text of the todo item. Most of the code here is just positioning. You can play with these numbers and see how it moves stuff around. Once all of the positioning code is completed, the frame of our todoTextLabel gets set to this newly created frame. This is done for each of our UI components. You can lay them out however you like, as I may not have the best layout.

We have one more method to override. It’s the setSelected method. Go ahead and add the following code.

This method gets called when the user taps on a given cell. We need to tell the cell how to behave when it gets tapped on. This method should look pretty straight forward. First, we call the setSelected method of the super class. Next, we update the background color depending on whether or not the cell was selected. Finally, the labels get set to a white color if the cell gets selected. This is to contrast the blue color that the background becomes when the cell is selected.

This last 2 methods that I want to talk about are the helper methods that we used earlier in the code. Add the following methods to your code.

newLabelWithPrimaryColor

This method got called when we were initializing our UILabels. It takes a few parameters that should be pretty self explanatory. Looking through the code, we first see the font being initialized with the size that we specified. If bold was specified this is also accounted for. Next, we instantiate a new UILabel and give it some properties. Finally, this newly created UILabel gets returned.

imageForPriority

This method is actually quite simple. It simply takes a priority and returns the UIImage that is associated with that priority. Notice the default clause. I decided to handle it like this instead of doing “case 1″ to handle all other cases. For whatever reason, if there is ever a priority that is not 1,2 or 3 it will, by default, have low priority.

Now that we have created our UITableViewCell, we need to display it in the table. Open up RootViewController.m and add the following import statement. This will allow us to use our TodoCell object.

Now find the numberOfRowsInSection method and add the following code

I’m not going to really go over this, as this is almost the exact same code as in the Fruits example. Basically, we are returning the number of todo items.

Now for the magic…We will now add our TodoCell to allow it to be displayed. Find the cellForRowAtIndexPath method and add the following code.

This code is fairly similar to the default code that Apple has provided us. The first change is we are instantiating our TodoCell object. We are creating it with the initWithFrame method and passing our identifier to it. Next, we get reference to the application’s appDelegate and use it to look up the todo item at the given index. This should be familiar. Finally, we set the todo item of the cell to the todo item at the row index and return the cell. That’s it! Go ahead and click the Build and Go icon and see your todo list come to life. Here is a screenshot of what your app should look like.

That concludes part 2 of this tutorial. Join me next time as I show you how to display detailed todo info using some new UI controls that we haven’t seen yet. As always, post your questions and comments in the comments section of the blog. Download The Sample Code

Happy iCoding!

Creating a ToDo List Using SQLite Part 1

If you have been following my tutorials, you know that we have been working primarily with UITableViews. This is mostly because SO many applications can be developed using this simple control. This final UITableView tutorial will be taking all of the skills learned from previous tutorials, putting them all together, and adding SQLite to create a prioritized To-Do list. I will also be showing you how to add multiple columns to your table cells and we will be exploring some of the other controls that the iPhone has to offer. What good would the tutorials be if we didn’t use them to create something useful.

I will move a little faster in this tutorial while still explaining the new stuff in detail. I will assume that you have completed the fruits tutorial and it’s prerequisites.

This tutorial will be a multipart series as it will be a little longer than my previous ones. In this first tutorial, you will learn:

So let’s get started…

Open up X-Code and Select File->New Project… Select Navigation-Based Application and click Choose…

Name your project todo. Now let’s create the todo database that we will be using. Open up the Terminal application on your Mac. This is located in Applications > Utilities.

If you have installed XCode, you should have mysqlite3 already on your computer. To check this, type:

sqlite3 into the Terminal and sqlite3 should start. Type .quit to exit. If sqlite3 is not installed, install all of the XTools from your Mac Installation Disk.

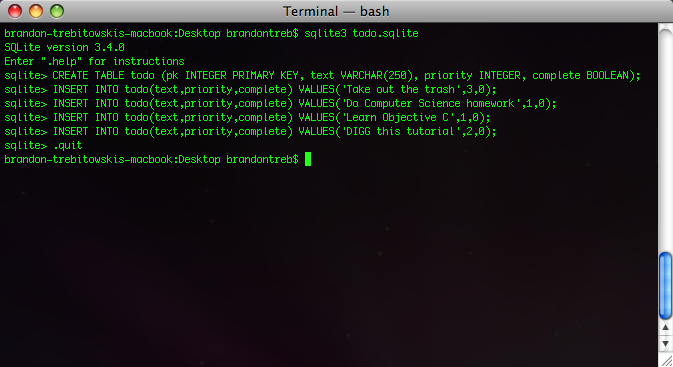
Now that the terminal is open let’s create the database. This is done with the command:

sqlite3 todo.sqlite

SQLite3 will now start and load the todo.sqlite database. By default the database is empty and contains no tables. If you need a refresher on the basics of SQL databases Google It. Since our application is fairly simple, we only need to create one table. We will create a table called todo by typing the following statement:

CREATE TABLE todo(pk INTEGER PRIMARY KEY, text VARCHAR(25), priority INTEGER, complete BOOLEAN);

One thing to note here is the pk field. It is the primary key of the table. This adds functionality such that every time a row is added to the database, it auto-increments this field. This will be a unique identifier to identify each row. All of the other fields should be fairly self explanitory.

Now that our table has been created, let’s add some data. We will eventually be adding todo items within our app, but for now we will add some defaults. Type the following commands below.

INSERT INTO todo(text,priority,complete) VALUES('Take out the trash',3,0);
INSERT INTO todo(text,priority,complete) VALUES('Do Computer Science homework',1,0);
INSERT INTO todo(text,priority,complete) VALUES('Learn Objective C',1,0);
INSERT INTO todo(text,priority,complete) VALUES('DIGG this tutorial',2,0);

You can add as many todo items as you would like. For this tutorial, make sure you enter a priority between 1 and 3 (You’ll see why later). Now our database has been created and populated let’s exit out of SQLite3. Do this by typing .quit. Your terminal window should look something like this.

Now go back to XCode. Do a Control-Click (right click) on the folder named Resources. Click Add -> Existing Files… and browse to your todo.sqlite file and click Add. It will then prompt you with a screen like this.

Make sure you check the box that says Copy items into destination group’s folder (if needed). You should now see the todo.sqlite file inside of the resource folder.

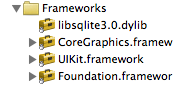
Now that we have added the database, we need to load the Objective C libraries so we can use it. Do a control-click (right click) on the Frameworks folder. Click Add -> Existing Frameworks. Now this part is a little strange. It has been my experience that these libraries are not in the same place on all machines. So in the search bar type in libsqlite3. The file we are looking for is called libsqlite3.0.dylib. This may pull up multiple files as OSX has it’s own versions of this file. Just click on the largest of the files that show up and click Add. As you can see, mine is about 1.7 MB.

Now it should add the framework and your directory will look something like this:

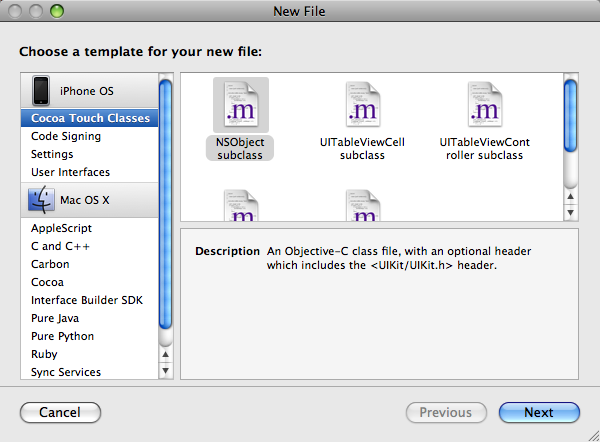
We need to create an object to hold our todo information. We will eventually be making an array of these objects to populate a UITableView. Go ahead and click File -> New File… Select NSObject Subclass and click Next.

Name this object todo.m and check the box that says Also create “Todo.h” and click Finish.

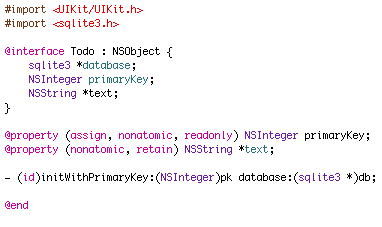
Open up todo.h and add the following code.

We see some new things here…First, there is a variable of type sqlite3 called database. This will be a reference to the applications database and will allow the todo object to communicate with it. Make sure you add a #import in your imports.

Next, we see a primary key. Notice that in the property declaration it has the keywords assign and readonly. This tells the compiler that this variable, once assiged, can not be changed again. This is good since each todo will be uniquely identified by this variable.

Also, I have declared a method called initWithPrimaryKey. This will be the contstructor for this object. It takes an integer to assign as the primary key and an sqlite3 object to use as the database reference.

Let’s implement this method…Open up todo.m and add the following code.

There are quite a few new things that need to be explained here. I will just go through it line by line.

static sqlite3_stmt *init_statement = nil

This will hold our initialize statement when retrieving todo data from the database. This statement is static, meaning it is independent of any instance. In other words, there will be only one of them no matter how many todo objects we create. This statement will get compiled and allow us to do some neat things. I’ll explain more in a bit.

The next lines makes sure that the super class (NSObject) initilizes properly before we initilize a todo object. We then set the local primary key and database objects to the parameters passed to the initWithPrimaryKey method.

Now some interesting stuff happens. The next lines checks if our init_statment is null. This will happen only once per launch of the application. If it is null, we create a new string containing an SQL statement. If you are familiar with SQL at all, this should look pretty familiar with one exception. What is a question mark doing in there? Well, I will tell you. After the SQL statement gets compiled, we can bind a value to it that will eventually replace the question mark. So this allows us to have 1 generic SQL statement, but bind different values to it to retrieve different results. So the next line, you guessed it, prepares the statement and stores it in our init_statement. The if statement just checks to see if this finished correctly and prints an error if there was a problem.

Moving on… The line sqlite3_bind_int simply replaces that question mark with the primary key of the current todo object, so what we end up with is statements like this:

SELECT text FROM todo WHERE pk = 1;
SELECT text FROM todo WHERE pk = 2;
SELECT text FROM todo WHERE pk = 3;
SELECT text FROM todo WHERE pk = n;

After that, the sqlite3_step(init_statement) method is called. This method executes the SQL statement on the database. It is contained inside of an if statement to make sure it executed properly. Now we can finally access the todo data. We see this line:

self.text = [NSString stringWithUTF8String:(char*) sqlite3_column_text(init_statement,0)];

Wow, that’s a mouthful… Let’s analyze it. The sqlite3_column_text method tells SQL that we want to retrieve a string object from the database. It has 2 parameters. The first, is just a reference to the SQL statement that was used. The second is the column number that we wish to get text from. So in this case, we only have one column (SELECT text FROM…) so there is only 1 index and that’s the 0th index. Next, the (char *) is just a cast to a string (might not be needed, but good practice). And finally, we build an NSString object with the data returned so that we can assign self.text to it.

This is quite a bit to explain in just text. If I have lost you, feel free to ask me questions in the comments.

We are done with the todo object for now…

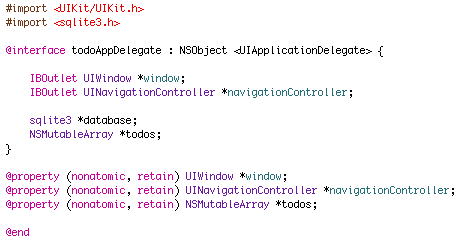
Go ahead and open up todoAppDelegate.h and add the following code.

This should look a little familiar with the exception of a few lines. Notice that I have created an NSMutableArray of todo objects. This will be (like the fruit example) an array to hold our todo items. We will eventually use this array to populate a UITableView. The only new lines here are the import of sqlite3.h and the sqlite3 *database line. Now let’s open up todoAppDelegate.m and add some code.

One new thing we see here is a private interface. We declared it here because it’s specific to this object so it does not need to be declared in the .h file. The 2 functions we will implement are createEditableCopyOfDatabaseIfNeeded and initializeDatabase. Much of the code for these has already been written for us inside of Apple’s SQLBooks tutorial. I will going through this code and explaining it the best that I can. Add the following code.

What this method is essentially doing is copying the database from your project folder to the documents folder on your iPhone. This will only happen once as it first checks if the database already exists in the documents folder. I’m not going to go through this line by line as it is fairly self explanitory. Apple does a great job of naming functions and variables so that we can understand what is going on. If I get enough requests in the comments, I’ll do a line-by-line writup of this function.

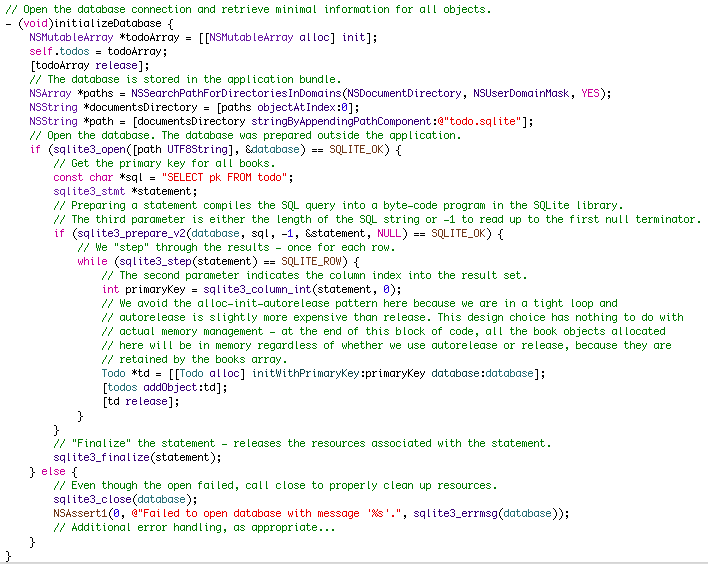
The next function we will implement is initializeDatabase. Add the following code:

That’s a lot of text! Don’t worry it’s mostly comments. Let’s analyze this code…Some of it is very similar to the fruits example.

The first line creates and initializes a NSMutableArray. We then go on to set this array to our object’s todos array and release the temporary object.

The next 3 lines locate the database we created inside of the documents folder. Following that, the sqlite3_open line open’s the database so we can access its data. If the database opens correctly, we then proceed to retrieve todo items. The first line:

const char *sql = "SELECT pk FROM todo";

is an SQL statement that we will use to get all of the primary keys from the database. We then prepare the statement (as we did inside the todo.m file) only this time there is no “?” in the statement. That is because there is not condition for retrieving the primary keys. We are simply saying “give me all of the primary keys in the database”.

Now we see a while loop that is stepping through the SQL results. Every time we call sqlite3_step, the next result gets retrieved. The line:

int primaryKey = sqlite3_column_int(statement,0);

retrieves the primary key from each result. This is very similar to retrieving the text in the todo.m class only we use the sqlite3_column_int method instead of the sqlite3_column_text method. This is done for obvious reasons.

After we have the primary key, we create a new Todo object and call the initWithPrimaryKey constructor that we created. The primary key gets passed as well as a reference to the database. This allows the Todo object to essentially “look itself up” in the database. Finally, we add the newly created Todo object to our array of todos.

The last statement sqlite3_finalize clears the statement from memory and does some other cleanup.

The last part of this tutorial is calling these functions to create and initialize the database. So add the following code to applicationDidFinishLaunching:

We are simply calling these functions. You can now click Build and Go but your application won’t display anything! You might be quite frustrated that you completed this portion of the tutorial and have yet to see anything. Well, stay tuned! I will have the next portion of this tutorial up soon.

For you ambitious programmers you could move on. If you notice, at this point we are in a similar situation as the fruit tutorial. We have an Array of objects that will eventually populate a UITableView.

This tutorial will be a 4 part series and I will show you how to use a few more controls. We will be adding, editing, and deleting todo items. If you have any questions, please leave them in the comments. Also, if you get lost you can download the sample code here

Happy iCoding!

original post can be found here

thanks to brandon for such a great tutorial

http://icodeblog.com/2008/08/19/iphone-programming-tutorial-creating-a-todo-list-using-sqlite-part-1/#init-db

Wednesday, May 13, 2009

http://dblog.com.au/iphone-development-tutorials/iphone-sdk-tutorial-reading-data-from-a-sqlite-database/

http://www.iphonekicks.com/tags/SQLite

http://www.iphonesdkwiki.com/Default.aspx?Page=SDK%20Tutorials&AspxAutoDetectCookieSupport=1

http://www.iphonearch.com/topic/7/sqlite-wrapper/.

http://www.mobileorchard.com/iphone-sqlite-tutorials-and-libraries/

http://www.squidoo.com/sqlitehammer

http://freshmeat.net/articles/sqlite-tutorial

http://leefalin.com/blog/2008/10/02/iphone-sqlite-database-basics/

Tuesday, May 12, 2009

Custom button in UITableViewCell - indexPath


I am currently working on iPhone app number two when I came across a problem that it has taken me a while to sort out. I wanted to place a button inside each UITableCell I am displaying. I then wanted to call a method when the user pressed that button which would perform some action on the information related to the contents of that cell.

For this to be useful I needed to be able to get the indexpath of the row in which the button was pressed. It took me a while to work this out but I eventually came up with a solution which is really simple, in fact so simple I am angry I did not work it out sooner. Below is the line of code I am using in my button method to get the indexPath.


NSIndexPath *indexPath = [self.tblView indexPathForCell:(UITableViewCell *)[sender superview]];

The method signature used was:


- (void)buttonMethod:(UIButton *)sender

From this point on I was then able to access the section and row of the cell in which the button was pressed using:


NSInteger section = indexPath.section;
NSInteger row = indexPath.row;

//for getting cell
UITableViewCell *retcell = (UITableViewCell *)[sender superview];

for deleting cell
switch(indexPath.row){
case 0:
[retcell removeFromSuperview];
break;
case 1:
[retcell removeFromSuperview];
break;
default:
break;

http://blog.beetlebugsoftware.com/post/104154581/face-detection-iphone-source#disqus_thread

http://iphonedevelopertips.com/

http://cocoawithlove.com/

http://www.fieryrobot.com/blog/

http://www.iphoneflow.com/

http://www.insanelymac.com/forum/index.php?showtopic=95195

http://www.71squared.co.uk/2008/12/custom-button-in-uitableviewcell-indexpath/

Friday, May 8, 2009

Displaying a password or text entry prompt on the iPhone


Writing your own iPhone or iPod touch app, and wondering how to create an alert like this? Check out the sample code below.

I needed to display a password prompt in Delivery Status touch and quickly found that there was no ideal way to do it. There are some unsupported methods, but the workaround below—adding a UITextField as a subview of the alert—is the proper method for a third party app, according to Apple.

Aside from the basic technique of adding a UITextField as a subview, there are two other things I struggled with. First, if the text given for the message was too long it would wrap to a second line and appear partially underneath the text field. I worked around this problem by adding my own UILabel subview. The custom label is a single line so you’ll get the standard ellipsis (…) if the text is too long. For the message text I just supply three blank lines, which makes the alert large enough to display the contents. It’s a clunky way to resize the alert, but it works.

The other thing I struggled with was getting the text field to match what Apple uses. The standard beveled edge looks okay, but Apple’s own password prompts have a field that’s customized specifically for alerts. My solution was to insert an image, and display the text field, without a border, on top of it.

Using those tricks, here’s the complete code I’m using to display a password prompt:

UIAlertView *passwordAlert = [[UIAlertView alloc] initWithTitle:@“Server Password” message:@”\n\n\n”
delegate:self cancelButtonTitle:NSLocalizedString(@“Cancel”,nil) otherButtonTitles:NSLocalizedString(@“OK”,nil), nil];

UILabel *passwordLabel = [[UILabel alloc] initWithFrame:CGRectMake(12,40,260,25)];
passwordLabel.font = [UIFont systemFontOfSize:16];
passwordLabel.textColor = [UIColor whiteColor];
passwordLabel.backgroundColor = [UIColor clearColor];
passwordLabel.shadowColor = [UIColor blackColor];
passwordLabel.shadowOffset = CGSizeMake(0,-1);
passwordLabel.textAlignment = UITextAlignmentCenter;
passwordLabel.text = @“Account Name”;
[passwordAlert addSubview:passwordLabel];

UIImageView *passwordImage = [[UIImageView alloc] initWithImage:[UIImage imageWithContentsOfFile:[[NSBundle mainBundle] pathForResource:@“passwordfield” ofType:@“png”]]];
passwordImage.frame = CGRectMake(11,79,262,31);
[passwordAlert addSubview:passwordImage];

UITextField *passwordField = [[UITextField alloc] initWithFrame:CGRectMake(16,83,252,25)];
passwordField.font = [UIFont systemFontOfSize:18];
passwordField.backgroundColor = [UIColor whiteColor];
passwordField.secureTextEntry = YES;
passwordField.keyboardAppearance = UIKeyboardAppearanceAlert;
passwordField.delegate = self;
[passwordField becomeFirstResponder];
[passwordAlert addSubview:passwordField];

[passwordAlert setTransform:CGAffineTransformMakeTranslation(0,109)];
[passwordAlert show];
[passwordAlert release];
[passwordField release];
[passwordImage release];
[passwordLabel release];

You can see the result of this code in the screenshot above. It can be customized fairly easily, if you need another type of text entry, more lines of text, or some other change. (Remove the secureTextEntry line or change the keyboardAppearance to customize the text entry field.)

I spent quite a bit of time getting it as pixel-perfect as possible. The only real difference is that it’s a few pixels taller than Apple’s, because of the imprecise way I’m sizing the alert. I think it’s fair to say most people would never notice! I’d love to see a more simplified, official method for creating these alerts, but in the meantime I’m pretty pleased with this solution. If you have any suggestions for improvements, let me know in the comments!


the original post is here

http://junecloud.com/journal/code/displaying-a-password-or-text-entry-prompt-on-the-iphone.html

Saturday, May 2, 2009

Creating a custom Table View Cell programmatically

Ohhk, quite a lot of things done but this one is something which I have used most often. Custom cells can sometimes greatly push ahead the usability of your application. In this post I am going to create a test project which will demonstrate how to create custom cells and use them appropriately to provide better usability. The application will finally look like this:


So to start open xcode and create a new project, chose the template as “Navigation Based” and name it as “CustomCellTestProject”. What template you chose does not matter, refer my previous posts to find how you can start working on any template.
First thing we will do is create a customCell. Right click on Classes and add a new UITableViewCell subclass. Name it as “CustomCell”. Now open CustomCell.h and add the following code:

#import

@interface CustomCell : UITableViewCell {

UILabel *primaryLabel;

UILabel *secondaryLabel;

UIImageView *myImageView;

}

@property(nonatomic,retain)UILabel *primaryLabel;

@property(nonatomic,retain)UILabel *secondaryLabel;

@property(nonatomic,retain)UIImageView *myImageView;

@end


We create the three elements and added them to the contentView of our cell.
synthesize all the three elements in CustomCell.m as we are going to access these elements from other classes.

@synthesize primaryLabel,secondaryLabel,myImageView;


Here we have simply added a primary label to display the primary text, a secondary label and an imageView. These elements will be created and added into the content view of our custom cell. So open CustomCell.m and add the following code

- (id)initWithFrame:(CGRect)frame reuseIdentifier:(NSString *)reuseIdentifier {

if (self = [super initWithFrame:frame reuseIdentifier:reuseIdentifier]) {

// Initialization code

primaryLabel = [[UILabel alloc]init];

primaryLabel.textAlignment = UITextAlignmentLeft;

primaryLabel.font = [UIFont systemFontOfSize:14];

secondaryLabel = [[UILabel alloc]init];

secondaryLabel.textAlignment = UITextAlignmentLeft;

secondaryLabel.font = [UIFont systemFontOfSize:8];

myImageView = [[UIImageView alloc]init];

[self.contentView addSubview:primaryLabel];

[self.contentView addSubview:secondaryLabel];

[self.contentView addSubview:myImageView];

}

return self;

}


Now, we have already added the UI elements into our cell but you must have noticed, we have not yet defined how these elements will appear inside cell. Go ahead and add the following code for that:

- (void)layoutSubviews {

[super layoutSubviews];

CGRect contentRect = self.contentView.bounds;

CGFloat boundsX = contentRect.origin.x;

CGRect frame;

frame= CGRectMake(boundsX+10 ,0, 50, 50);

myImageView.frame = frame;

frame= CGRectMake(boundsX+70 ,5, 200, 25);

primaryLabel.frame = frame;

frame= CGRectMake(boundsX+70 ,30, 100, 15);

secondaryLabel.frame = frame;

}


You can do anything in this method to define the lay out of cell. I have simply assigned frames to all the elements.
You can also find a method in CustomCell.m

- (void)setSelected:(BOOL)selected animated:(BOOL)animated {

[super setSelected:selected animated:animated];

// Configure the view for the selected state

}

This method can be used to define how your cell should react when it is selected. You can describe what should be the highlight color or may be you want to flash one of the labels anything of your choice. I am leaving this method as it is.
We are done with creating our custom cell and now we have to use it. Open RootViewController.m and import CustomCell.h at the top.


#import “CustomCell.h”

I am going to create 5 cells here, you can just use your own logic of specifying number of cells and data. So change the following method to look like this:

- (NSInteger)tableView:(UITableView *)tableView numberOfRowsInSection:(NSInteger)section {

return 5;

}

Now we are going to use our custom cell. If you look at the cellForRow method, you will find that a UItableViewCell has been created and re used. Now all we have to do is to replace this cell with our new cell. Change the code inside this method to look like this:

- (UITableViewCell *)tableView:(UITableView *)tableView cellForRowAtIndexPath:(NSIndexPath *)indexPath {

static NSString *CellIdentifier = @”Cell”;

CustomCell *cell = [tableView dequeueReusableCellWithIdentifier:CellIdentifier];

if (cell == nil) {

cell = [[[CustomCell alloc] initWithFrame:CGRectZero reuseIdentifier:CellIdentifier] autorelease];

}

// Set up the cell…

switch (indexPath.row) {

case 0:

cell.primaryLabel.text = @"Meeting on iPhone Development";

cell.secondaryLabel.text = @"Sat 10:30";

cell.myImageView.image = [UIImage imageNamed:@"meeting_color.png"];

break;

case 1:

cell.primaryLabel.text = @"Call With Client";

cell.secondaryLabel.text = @"Planned";

cell.myImageView.image = [UIImage imageNamed:@"call_color.png"];

break;

case 2:

cell.primaryLabel.text = @"Appointment with Joey";

cell.secondaryLabel.text = @"2 Hours";

cell.myImageView.image = [UIImage imageNamed:@"calendar_color.png"];

break;

case 3:

cell.primaryLabel.text = @"Call With Client";

cell.secondaryLabel.text = @"Planned";

cell.myImageView.image = [UIImage imageNamed:@"call_color.png"];

break;

case 4:

cell.primaryLabel.text = @"Appointment with Joey";

cell.secondaryLabel.text = @"2 Hours";

cell.myImageView.image = [UIImage imageNamed:@"calendar_color.png"];

break;

default:

break;

}

return cell;

}


I have added some dummy data. You can use your data source to provide data for primaryLabel and secondaryLabel. Please note that I have used three images here. You can use any image of your choice. All you need to to do is copy the images and paste it into your project root folder (which in this case is CustomCellTestProject folder). After pasting the files, in xcode right click on Resources (or any group), select Add >> ExistingFiles and then select all the images you want to add in you project. Once added you can simply use them by their names.
Thats it, go ahead and run the project. You will find something wrong when you compare you simulator screen with mine. If you noticed in the CustomCell.m, I have given some frames to the UI elements. You need to make sure that the height of your cell large enough to accomodate all the elements. So add this following code and you fixed the issue:

- (CGFloat)tableView:(UITableView *)tableView heightForRowAtIndexPath:(NSIndexPath *)indexPath

{

return 50;

}


this is not my post the original post is here


http://blog.webscale.co.in/?p=284